|
|

  
|
|
|
|
One of Scholar and Educator's unique features is the bank of Glossary Buttons that are available in the Question and Answer panels of the editor and in the Fill-In-The-Blank answer entry panels.
![]()
The picture above shows the button bar as it appears in the editor (there is no Edit Buttons... button in the Fill-In-The-Blank panels) with each button assigned to an accented a or e character.
A separate set of stored strings is maintained for Questions and Answers and there are 9 selectable sets of buttons for each. This allows you to program 90 separate strings for use in creating Questions and another 90 strings for use in creating and entering Answers. The strings themselves are stored in the file C:\Documents & Settings\<Current User>\My Documents\My WinFlash Files\glossary.glo.
Using The Buttons
To use the buttons after they have been programmed (see below), simply position the cursor where you want the string associated with the button to be inserted and then click on the button with the mouse. The character associated with the button will be inserted at the cursor location.
The insertion can be in one of two modes. Normal Paste, which inserts the string at the cursor location using all the font face, size and effect formatting that was entered when creating the string in the Glossary Editor and PasteSpecial which inserts the string at the cursor location, adopting the font face, size and effect formatting that is in place at the cursor location. This is the default operation of the program. The setting can be changed by checking or unchecking the Insert Strings Using Paste Special checkbox in the Glossary Editor or, when in study mode, by clicking on the Educator or Scholar menu item. E.g. if the menu item says "Use Normal Paste Formatting for Glossary Buttons", clicking on it will change the operation from PasteSpecial to Normal Paste and the menu, when next viewed will say, "Use PasteSpecial Formatting for Glossary Buttons".
To change which set of previously-programmed characters is assigned to the buttons, use the spin control selector at the far right of the button bar.
Programming The Buttons
To program the Glossary Buttons, open any source file and then open the editor. To program the Question-associated buttons, use the Edit Buttons... button on the Question panel. Similarly, the Answer-associated buttons are programmed from the Edit Buttons... button on the Answer panel.
Clicking either of these buttons brings up the dialog shown below:
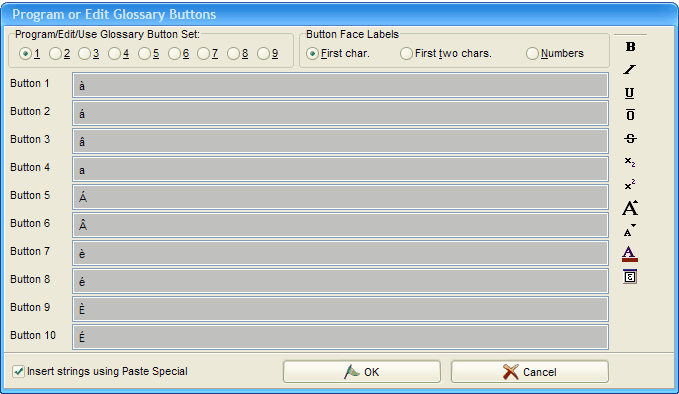
First, select the set that you wish to program by clicking one of the 9 radio buttons in the Program/Edit/Use Glossary Button Set radio group. The other radio group determines whether the buttons themselves display either the first or first two characters in the string that they represent OR simply the default captions 1 through 10. The First Two Character setting is designed specifically for certain foreign language fonts that require two sequential characters to create a single, properly accented, character.
Programming each button is done by entering the string that you wish associated with the button into the edit box to the right of the corresponding button's title. For regular text strings simply click in the appropriate edit box and type in the string. For situations like the one shown above, it's easiest to use the Character Inserter.
For entering successive characters from the Character Inserter, I've found the following sequence to be effective:
Click in the edit box where you want to enter the special character. Click on the Character Inserter button (the one with the '∑' symbol at the bottom of the column of buttons). When the Inserter appears, double-click on the character you wish to insert. Close the Inserter. Repeat with the next edit box.
When you have completed programming the set of interest (not all buttons need be associated with a character string) click OK and the newly created strings will be saved and you'll be returned to the editor.
Note: While WinFlash Basic does not support Glossary Buttons in normal operation, it WILL support these buttons in the test-taking mode IF the a copy of the glossary.glo file is placed in the My WinFlash Files directory on the machine on which the copy of WinFlash Basic is loaded.
During the creation of the .FLT file in Educator, the settings for ShowGlossaryButtons, Use First Character and the selection of the Glossary Set must all be in the state you want transferred to the .FLT file.
Page url: http://www.openwindow.com/helpfile/glossary_buttons.htm