|
|

  
|
Main|Educator|Compile Study (.FLZ) File or Main|Educator|Compile Test (.FLT) File
Important Note: Compiled files CANNOT be renamed - it will cause them to malfunction when WinFlash tries to open them. Be sure that the root name of the source file you use to compile the .FLZ or .FLT file is what you want the file to be named. Otherwise you will have to recompile to change the name. If you want to compile a .FLZ or .FLT with a different name than the .FLU file, simply open the .FLU file and use File|Save As to save a copy of the .FLU file whose root name is the name you want for your .FLZ or .FLT file.
Important Note: Compiled Test (.FLT) files CANNOT be created from .FLU files that contain any standard Q&A pairs. For help in handling source files which still contain standard Q&A pairs see Part 1 of Create A Compiled Test File.
Note: The file-specific settings of color, font, etc. are stored in the .FLZ or .FLT file itself. There is no need to distribute the companion .fld file. These options are taken from the settings for the .FLU file used to create the .FLT file. Thus, you'll want to be sure all the settings are the way you'll want them when the test is taken before selecting Compile Test (.FLT) File from the Educator menu. See Test File Options for more detail on the way the option settings are handled for this type of file.
If you are planning general distribution of your files remember to use fonts that are commonly available on all Windows machines. Times New Roman, Arial and Courier New are generally safe bets.
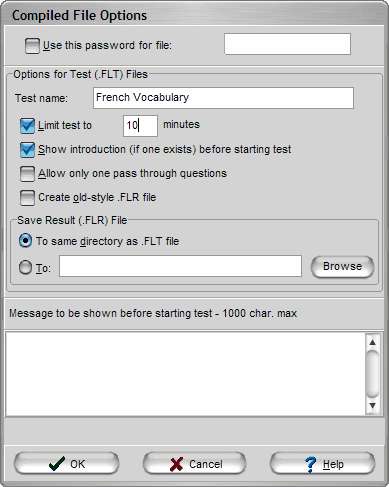
The dialog shown below appears after selecting the Compile Study (.FLZ) File or Compile Test (.FLT) File selection on the Educator menu.

Starting from the top, the Compiled Files Options dialog contains the following data and controls:
Use This Password for File - If this option is selected, you can enter a case-sensitive password to be used in the creation of the .FLZ or .FLT file that the user must enter before being able to use the file. If the option is not selected, then the file will open without asking the user for a password. For .FLZ files, this is the only option that is valid.
Options below only pertain to .FLT files
Test Name (Required) - Enter a short, descriptive name for the test - it will be used in displaying and printing the results of the test.
Limit Test To __ Minutes - Selecting this option and filling in the number of minutes (whole minutes only) causes the resulting .FLT file to run with the entered time limitation. See Question Dialog - Test Mode for more information.
Show Introduction - Selecting this option displays the associated introduction before beginning the test.
Allow Only One Pass Through Questions - Selecting this option causes the resulting .FLT file to allow only one pass through the questions. See Question Dialog - Test Mode for more information.
Create Old-style .FLR File - When checked, the .FLR files that are saved when taking the test will be saved in the old - WinFlash Administrator-compatible file format. This removes any font formatting from the displayed Q and A text in the result file. Only use this option if you are, in fact, using Administrator to process the .FLR files.
Save Result (.FLR) File - Allows setting the destination directory where the .FLR file will be saved. Default is to save it to the same directory that contains the .FLT file. If you use the To: selection, be sure to enter a full path name that will be accessible on any machine that will be used to administer the test.
As an example, in a networked computer lab where all machines have drive d: mapped to the file server's c: drive you could use:
d:\testrslt
as the path. Thus, as students completed their tests on the multiple lab machines, all the results would end up in the server's c:\testrslt directory, making it very easy to access and grade the exam.
Message to be shown... - Any message entered here will appear as the first dialog (other than the password dialog if a password has been used) after the .FLT file is loaded. Use this feature to display special instructions to the students. A possible message might be:
"Please use the Last Name, First Name format when asked for your student name. Use the 8-character student ID that was distributed in class when asked to enter your student ID. When done with the test, click on the "x" in the upper right corner of the Question dialog or hit Alt-F4. Good Luck!!"
OK - Initiates the creation of the .FLT or .FLZ file.
Cancel - Exits without creating a file.
Help - Brings up this help topic.
Page url: http://www.openwindow.com/helpfile/creating_compiled_files.htm